analytics & adsense

Showing posts with label selfie. Show all posts

Monday, October 12, 2015

09-28-15 Phase 3 of driveway "redo"

Here in this post we pick up on Phase 3 of my driveway "redo" project which is explained in the post about Phase 1 here and then you can check out what I got done just before this in Phase 2 here! I spent the majority of the day working on this project because I wasn't able to start until mid-morning and by then it was already hotter than I had expected. We were blessed with a few mellow days with temps in the low 90s after the rain we had gotten and on THIS day it decided to get back up around 105-110. But I was at a point in the project that I was very eager to continue and pick up on, excited to be reaching a point where it looked near done, at least to the level of done I plan to get it to for now. So I would work and take breaks and then work some more, using up the better part of a day.


I decided to start with the new driveway part that branches off to the right from the main driveway and leads to that double gate to the future pasture. You can see from this picture that those rocks weren't necessarily in a good place so they had to be moved again. But what you can't see is just how many weeds there were up by the fence and to the left of it. I wanted to go ahead and get rid of all of those. 


I began by raking all the loose debris and small weeds from that burn pile over to the gate, raking them up towards the new line for the driveway to "clear the path" if you will.


This took awhile but I do actually enjoy work like this because I'm one of those people who enjoys raking, sweeping, mopping, vacuuming, etc because it feels like happy work for an OCD person. =) And then the result was pleasing which was what appeared to be an "intentional" path big enough for 2 cars or a large truck or even tractor! Success!


Here is another view from the other side of the debris and junk ALMOST raked away...


Me, happy to be working outside but it was pretty hot!!!


I am a huge fan of before and after's and even before and now's because it is a visual reminder or gratification for me of the progress that has been made. It gives me that jolt of contentment that refuels me to push on.


Once I got the rocks placed where I wanted them to remain, I got all the weeds up to the left by the gate removed and the only thing up there now is that bamboo, which will eventually be removed as well. And then I got everything raked out of the way.


This made me happy and was about the most I plan to do with this area for awhile, other than removing the bamboo and adding gravel. We won't have a need or use for that gate until next year some time so for now this is what I set out to accomplish and from now on I'll just keep the road way clear of weeds until the gravel goes down.


Here is a good before and now! I say "In Progress" because obviously this area of the project is not finished but it won't be awhile and that is alright by me! For now!


Once I got the gate area cleaned up on the far side of this photo I just had to do an In Progress photo of this area, too! But the top photo in the collage above is from the other day before I got all those weeds removed.


Here is a great before and now photo collage of the work done just in front of the house, where the driveway splits left and right and where there will soon be visitor parking room by a new front gate (after the bamboo is gone)! I love this photo collage!!!!!! <3


Then I moved over to the driveway. The other day I had gotten the rocks placed and some of the weeds on the left knocked down but not all of them. So after that side gate area was cleaned up I focused my energy on getting all the weeds off this left side so you can see both rows of rocks and it look like an intentional driveway.


Here I had gotten the weeds at the end of the driveway taken care of and just had a few smaller ones up at the front to tend to.


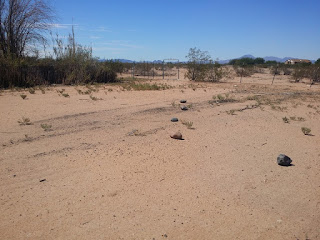
I got ALL the weeds out of the driveway! Except you may notice that small little bush RIGHT there. Haha! I must say, when I was chopping down weeds I saw this little weed/bush of wild flowers that were blooming  beautiful yellow and I just couldn't! I thought "Maybe it won't be too much in the way". So I get all the other weeds down, I put UP my weed eater and TWO extension cords it takes to reach this side of the yard, haha, and then come back out and spend an hour RAKING the entire driveway end to end. I raked from the middle off to each side to clear any other debris, small weeds I had missed and level out the existing minuscule gravel. So then once all that was done I came and stood back here to take my "after" photo, Yay...only to find just how much that little bush really bothered me. Again...OCD much?!?! So...I had already put away all my tools to get rid of it with AND I was tired and hot and felt just annoyed with the idea of getting everything back out, throwing my cords around and all that fuss just to come remove that one plant. Talk about slapping yourself for wishing you had done something the first time around.


When my pants and boots are this dirty and covered in dust, I know I'm getting something done and working with my body and it makes me feel proud, happy, capable, able and content! <3 Who said a single Mom can't setup a homestead mostly on her own? =)


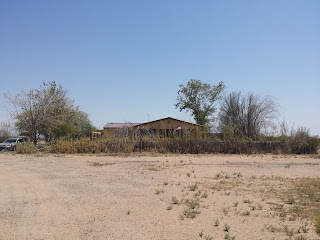
View of the driveway "done" for now from the south. I still need to remove the debris from that burn pile and, of course, remove that little bush...and then I'll feel like it's truly done until I move onto the next phase in a couple of months. And that next phase is gravel, trees and water lines.


View of the driveway BASICALLY done from the north. (That damn bush!) Ahhhhhh! 


People often know me as Elizabeth, the Realtor, single mom, woman who loves her aviators and who has very long, thick curly, wild hair. And the majority of the time when I'm out and about being social or working they'll see me with my hair down and I'm typically in a long summer dress and sandals. It is my go to outfit, my "make me feel pretty and girly" outfit. But what most people don't usually see (only a handful have really) is me when I'm the happiest which is when I have no make-up at all on, hair up in a knot, jeans on, boots on, sweating my butt off, calluses on my hands, bottle of water in my back pocket, etc. Being raised in Arkansas you might think I grew up this way but I really didn't. We lived in city limits the majority of my life until I moved in with my sister when I was 12. At that point we lived in the country. Prior to that I had summer's with my Dad or his parents and those were the real boonies and times when I spent as much time outside as I could, being a lil country girl playing in the mud, climbing trees, riding four wheelers, hanging out with my boy cousins! But throughout life I have come to find I am happiest outside. Being raised in the Phoenix metro from the age of 15 to 21, some "city" rubbed off on me but when I started hiking the local mountains for exercise, I realized how much I loved it. That grew and fostered a love of the outdoors in Arizona, even though it is insanely hot. But hiking and running outdoors even in the summer, over the years, I came accustomed to the weather we have here. And so this all brings me now to where I am 30 and I've been itching the last few years to raise my son in the country so he may have a childhood covered in mud as I did part of mine. And I do think if I never had a reason to dress up ever again and spent every day on this property working on clearing land, growing a garden, tending to animals...I'd be just fine with that! <3 I have finally found what makes me the most happy in my life and that is being far away from other people, tending to everything myself and learning a lot along the way, teaching my son useful skills he needs to know for adult life!


For good measure, I can't forget the progress photos of the driveway!


And of course, lastly, the final before and now photo of the driveway from the gate to the house! To some it may not look like a whole lot was done but this took me probably a good 20-25 hours total over the course of numerous days to get this work done being as I did 90% of it on my own. Riley helped with the fire and hauling around some rocks and firewood but for the most part I knew he didn't need to be working outside in 110 degrees weather because he isn't used to it like I am.

I am excited for the near future when I can share with you the next phase of this project. As of now, there isn't a planned date for what we'll do next but it will include; gravel, 6 new trees and running irrigation lines from the well to said new trees. Until then...

XoXo,
Elizabeth

09-20-15 Phase 1 of our driveway "redo"

My last blog post Creating a new parking area we left off where I had just been given free river rock from a friend and I used those to create pathways and walk ways in the parking area of our driveway up by the house. This one picks up where I began the driveway process. Ever since I was a child I've had a thing for long, tree lined driveways...maybe it's a southern thing, I'm not sure. But from the first time I came to this property I thought it was odd that the gate was almost centered on the front of the house yet the driveway curves to the left to the parking area. So since I had these river rock I knew I wanted to begin the very early stages of "moving" my driveway to where I wanted it. The end goal is to have a driveway that goes straight from the gate up to the house then you can go left to the shop and where I park or go right to go to the gate to the open field. And then on top of that visitors can pull straight up and have plenty of room to park right in the front, in front of the front porch. Makes sense, right? Ha! So in addition to that I want the driveway to eventually  have 2-3 trees on each side with flowers along the bottom and for the driveway itself to be graveled to cut down on all the dust around the property. So phase 1 of that huge project (that will likely take me a year) is to "move" the driveway to where I want it. So the goal for this smaller project is to use the river rock to create new lines, then eliminate all the weeds and bushes in the way of that, clean up the pathway and just begin using it. Next I will add gravel to the entire driveway. Later on down the road (maybe next Spring) I'll put in the trees which will have to have irrigation lines ran to them as well as critter-proof "cages" around the trunk of the tree to prevent gophers from digging up the roots so that they can plant properly. After all that is successful I'll add some flowers!

So on to phase one!!!


Here is a "before" picture of most of the driveway and the front of the house just a couple of weeks after we moved in. I can't find a better picture taken back from the gate so you can see the whole thing but in this photo I'm standing about half way between the gate and the house and you can see the driveway (where there are no weeds) wandering off to the left and my car off in the distance on the left. In this photo there was still a dead tree just to the left of my flag, on THIS side of the fence line.


 I began by placing the rocks on each side of the driveway where I wanted it to go, straight south towards the house. The rocks on the left you can barely even see because they're amidst weeds and wild flowers.


Here is a shot of where I'm using the rocks to CREATE a whole new road that goes to the right side of the house to that double gate, which opens up into our side field. This field is now 4 acres of natural desert nothingness and in the future the plan is for it to be cow and horse pasture! So it only makes sense to create a road TO the gate even though it won't be used frequently for awhile. Planning ahead!!!


Here the rocks are on the left and this is where the driveway will go left and lead to our main parking area at the side of the house.


This is a final shot standing up by the fence line of bamboo by the house. You can see the remnants of that dead tree I cut down that still needs to be dealt with.

I got this done in a few hours in the afternoon by myself while Riley was at school. The following 3 days we had rain and I wasn't able to work on it at all. But as soon as the rain cleared up I moved on the phase 2! Which you can now find here!

XoXo,
Elizabeth

Tuesday, September 22, 2015

06-13-15 Adapting to life in the country

As with any older home, especially one that has been through several remodels and then sat empty for a bit...you are bound to move in and then find problems just from living there and using everything. The first major problem we had was a water leak on the part of the water main that comes into the property.  Here we have city water AND a private well. The city water goes to the house and the well provides water to several water spigots throughout the property. In the future I'd like to have the well on the house as well to get rid of city water to try to go as off grid as possible BUT prior to that happening, the well will feed into a large irrigation system I plan to setup for our garden, fruit trees and many plants. But back to this story, we had a leak. I am an avid Do It Yourself-er so I began researching. I found numerous videos and articles online telling what this problem was and how to fix it.


The dogs liked the water leak, although it made a mud puddle they would still run over there everyday to lap it up.


After going to the store and buying a couple of different wrenches I couldn't even get the damn nut off of it. It was so tight and I was afraid if I used all my force I might break or crack something since it is aged metal that has been in the sun...for forever. Not to say that I have he man strength but when you're pushing something so hard that the whole thing is moving...I'd rather leave a problem then make a problem worse. So I relented and after a week and a half and 4 failed attempts to fix it myself, I called the seller. Within a week or so he had someone out who promptly fixed it...awesome! #thatwaseasy At least I tried!


Riley made fun of me when I bought a little Home Depot apron like this for him and me because in our adventures to try to fix that water main and work on the front gate we'd get all the way out there with the tools in our hands and if I wasn't wearing jeans to stuff my pockets full...one or both of us would end up having to walk back to the house or shop just to get 1 tool we had forgotten or didn't have room to carry. So, these did serve as useful and I snapped up 1 quick shot of him wearing his because he said "You better not tell anyone I ever wore this thing!" hahahahaha!


Our dogs! Our fur babies and the loves of our lives! Max is on the left, he's our baby boy. Although he's older than Bella and almost 5 or 6, we call him baby boy because he is scarred of everything and he's smaller than Bella. He is a mix between Pitbul and Calhouta Leopard dog...which is a breed I had never even heard of prior to adopting him. He basically is built like a pit but has shorter legs, has a hunting dogs tail (like a pointer) and his coat looks like gray camo! He also has grayish eyes! He's gorgeous!!!!


Bella Marie is our golden lab that my ex and I adopted while together because he wanted a female dog and one he could train to go hunting with him. So we found her and rescued her and she is THE love of MY life! I call her big girl just because she's bigger than Max and probably the biggest dog I've had since I was a kid because small dogs have seemed to find their way into my life although I much prefer larger breeds. She is the most gorgeous color of blonde and also has these yellow or honey colored eyes that just...melt my heart. Her looks wouldn't be so stunning if it weren't for her personality of being the sweetest, most gentle dog. She listens well, is very grateful for being rescued,  absolutely adores affection and she likes to "slap hands" and give you her paw...all the time! <3 Some days she even wakes me up by giving me a "slap hands" on my face, haha! But most, this big girl loves to be outside! She's a true lab at heart with that love of the outdoors and she'll just run and run and run and run until she can't breath anymore and sometimes even then we have to make her come in so she will lay down. She is my girl and sleeps on her camo bed at the foot of my bed although I do invite her in my bed when I just feel like it because...why not.


Max is Riley's BFF and has been from Day 1. We got Max maybe about 6 months after my younger son Konnor moved to his Dad's in Arkansas so Riley was really needing some sort of companion around because he wasn't used to be without that little brother that followed him around everywhere and got into everything he was doing. So Mr. Max sleeps IN bed with Riley, EVERY night, without fail. It can be 8pm or 10pm and I tell Max "Time to go to bed" and he will run to Riley's room and jump on the edge of the bed. Riley has a twin size bed now and he himself is almost as tall as me, although he's only 11. He is about 5 foot 2 inches and so that twin bed WITH  Max in it...they are close to running out of room, lol!


My lovely Bella!


One way I began adapting or reverting back to country life is that I knew I had to start stocking up on tools, all varieties. This jig saw I found at a yard sale and once I got home I realized I had just bought MY FIRST POWER TOOL, EVER!!!! I immediately told my Mom, because I knew she'd be proud of her baby girl. Then I took this ADORABLE selfie and posted it on facebook! My Facebook friends were just as happy for me, haha! I've yet to use this for any project but I have several in mind where I'll need it so I'm so glad I got it!


One thing I realized about myself a couple of years ago was just how much I enjoy doing things myself. Sometimes I'll do something because it is cheaper than buying it or paying someone but other times I do it just because it makes me feel good. It is something about feeling capable and able to do something that really makes me feel like the most useful human being. It was one Christmas maybe 4 years ago when my Mom and I were discovering Pinterest and found a homemade facial sugar scrub and that, with the help of Pinterest, led to endless ideas of DIY heaven!!! So, after we were settled in the new house I had been wanting to try this DIY homemade Febreeze! First, let me say, I love Febreeze. It is probably a daily ritual with a son and 2 dogs for me to go through the house every morning and spray the furniture, bedding, dog beds and curtains. So...when I found this recipe I just had to try it. Honestly it is so super easy, that after the first time I didn't even need the instructions to make it again. I will share the link to the blog with the instructions I followed:


In pulling up recipes of my homemade sugar facial scrub to send to a friend who had asked for it I came across a recipe for a DIY Sugar Shave Cream. It is all the same stuff you use for the sugar scrub but a different consistency and  you use this in place of shaving cream or soap and it is great to shave with while also giving you a light exfoliation! So of course, you skin feels amazing after! And FYI, you can never have too many mason jars on a farm or homestead! 


And here is a shot of the shave cream on the left and the facial scrub on the right, you can see how the consistency is different. These two I didn't even put any scents or essential oils in because I didn't have any at the time and smell is more for aromatherapy benefits. But typically I'll do a coconut scent and then around the holidays I'll do a peppermint scent because I love peppermint! But if you have certain things that you use aromatherapy for go with that. For example, citrus smells are mood boosters and help to reduce anxiety and the blues. If you need calming and relaxation, go with lavender. Just research which one would be best for you. Here is the link to the sugar scrub that I use most often:


In case you don't know yet, you will soon learn I am a lover of Coconut Oil! It is one of the very few things I'll use on my face. In fact all I put on my face is make-up, sugar scrub, coconut oil and Shea butter. I don't buy any make-up remover, face wash, face scrub, moisturizer, etc. I use all natural and people often compliment me on my complexion and I'm quick to tell them how easy, cheap and simple it is to go all natural on your face. I think it really is the "secret" to youthful skin! Here is a good article!


So in June that is where we were on adapting to life in the country! And finding it pretty splendid, if I do say so myself! =)

XoXo,
Elizabeth